 Save
Save There's something about the smell of boiling sugar that instantly transports me back to childhood fairs, but my real love affair with candy apples started by accident in my kitchen one autumn afternoon. I'd overheard a coworker raving about them at a farmers market, and instead of buying a pair, I decided to attempt making them myself. The first batch was a sticky mess, but something about that glossy red shell and the satisfying crunch between your teeth made me keep experimenting until I nailed it. Now whenever October arrives, my kitchen becomes a candy apple station, and I've learned that the secret isn't complicated—it's respect for temperature and patience with the dipping process.
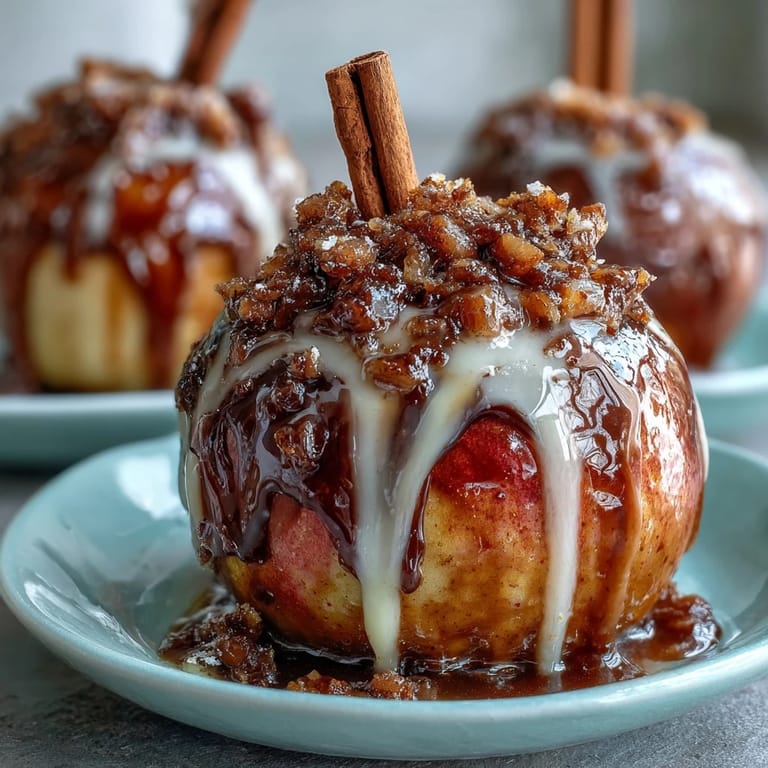
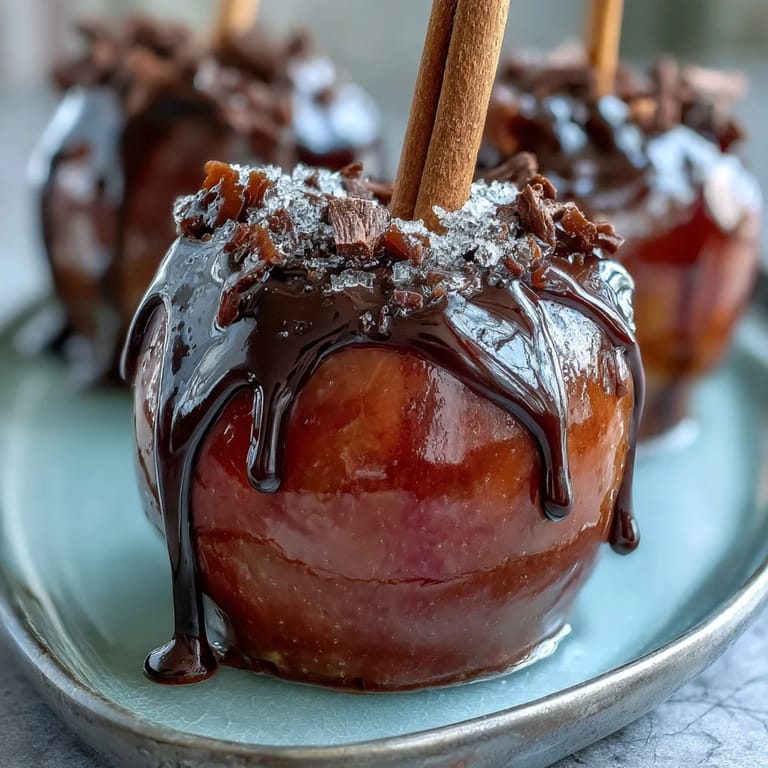
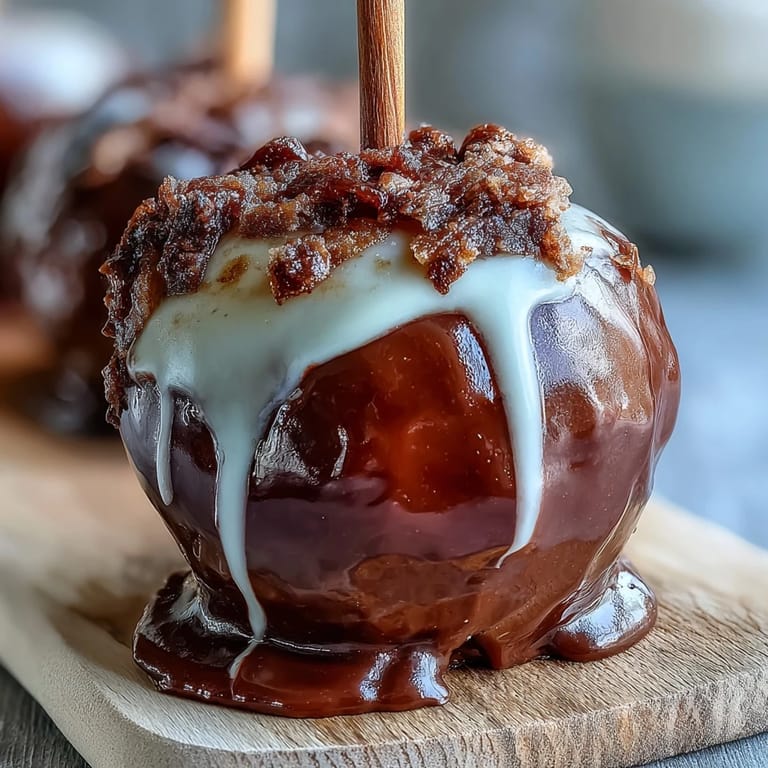
I made these for my daughter's school bake sale a few years back, and watching kids' faces light up when they bit through that shiny red coating reminded me why I love cooking. One boy came back asking if they were real apples inside, as if I'd somehow tricked him into eating fruit—his genuine surprise made my entire week. That's when I realized these aren't just a treat; they're little moments of wonder wrapped in sugar and chocolate.
Ingredients
- Granny Smith or Gala apples (8 small to medium): Choose firm apples without soft spots because they need to hold up to the hot candy coating; wash and dry them completely or the candy won't stick.
- Wooden sticks (8): Craft sticks or popsicle sticks work perfectly, and inserting them deeply into the stem end gives you control when dipping.
- Granulated sugar (2 cups): This is your base for that glossy, hard candy shell that makes the whole magic happen.
- Light corn syrup (1/2 cup): This prevents crystallization and keeps your candy smooth and clear rather than grainy.
- Water (3/4 cup): Gets the sugar mixture to the right consistency before heating.
- Red gel or liquid food coloring (1/2 tsp): Gel coloring gives deeper, more vibrant red than liquid, and it won't thin out your candy mixture.
- Cream of tartar (1/8 tsp, optional): A small amount keeps the candy from becoming grainy, though I've skipped it and still succeeded.
- White chocolate (3 oz), chopped or chips: Quality matters here because cheap white chocolate tastes waxy; splurge a little on a brand you'd actually eat.
- Coconut oil or vegetable oil (1 tsp, optional): Thins the white chocolate just enough to drizzle smoothly without breaking the candy shell.
Tired of Takeout? 🥡
Get 10 meals you can make faster than delivery arrives. Seriously.
One email. No spam. Unsubscribe anytime.
Instructions
- Prep your apples and workspace:
- Line a baking sheet with parchment paper and lightly grease it so nothing sticks later. Push a wooden stick firmly into the stem end of each apple—it should feel secure and go at least an inch deep.
- Combine your candy ingredients:
- Pour sugar, corn syrup, water, and cream of tartar into your heavy-bottomed saucepan and stir gently just until combined. Use a heavy pan because it distributes heat evenly and prevents hot spots that can burn your candy.
- Heat without stirring:
- Attach your candy thermometer to the side of the pan and set it over medium heat. Let the mixture come to a boil without touching it anymore—stirring now will cause crystallization and ruin everything.
- Add color at the right moment:
- When the temperature reaches 250°F (121°C), swirl in your red coloring gently by tilting the pan, never stirring. This is a crucial moment because the color distributes evenly from the movement of the bubbling mixture itself.
- Reach hard crack stage:
- Keep watching as the temperature climbs toward 300°F (149°C)—this is where the candy goes from soft and chewy to that satisfying hard shell. Have your apples ready because once you hit temperature, you must work fast.
- Dip with confidence:
- Remove the pan from heat and immediately tilt it so the candy pools on one side. Grab an apple by its stick, dip it in a smooth rolling motion, give it a little twirl, and let the excess drip back into the pan—this takes maybe 3 seconds per apple, so channel your focus.
- Set the candy:
- Place each dipped apple on your prepared baking sheet and let them sit undisturbed for about 10 minutes while the coating hardens into that beautiful glossy shell.
- Melt your white chocolate carefully:
- Put chopped white chocolate and your optional oil in a microwave-safe bowl and heat in 20-second bursts, stirring between each one. White chocolate burns easily, so those short bursts prevent any scorching.
- Drizzle the finishing touch:
- Use a spoon or piping bag to create thin white chocolate lines across the cooled red apples. Let everything set for another 10 minutes before you serve them.
 Save
Save The year I brought a tray of these to my neighbor's book club, they disappeared before anyone even sat down to discuss the book. Everyone wanted to know my secret, and I loved telling them there really wasn't one—just patience, a thermometer, and respect for the candy-making process. That's when I learned that food doesn't need complicated techniques to be memorable; sometimes the simplest things executed well become the ones people actually remember.
The Candy Temperature Game
Understanding candy stages changed everything for me because I stopped guessing and started understanding what I was actually making. Soft ball, hard ball, soft crack, hard crack—these stages aren't just fancy names; they're temperature checkpoints that determine whether your coating will be chewy, snappy, or impossible to bite through. Once you hit that 300°F mark, you've got maybe a minute before the candy becomes too thick to work with, so having everything ready beforehand keeps you calm and collected during those crucial dipping seconds.
Making Them Your Own
While the classic red and white combination is stunning, these apples are basically a blank canvas for your creativity. I've experimented with crushed pistachios rolled into fresh candy, dark chocolate drizzles for a more grown-up vibe, and even sprinkles of sea salt flakes that made people absolutely lose their minds. The beauty is that you can customize them the moment they come out of the hot candy—while it's still tacky, whatever you press into the coating will stick perfectly.
- Try rolling in finely chopped nuts, sprinkles, or crushed candy canes before the coating sets completely.
- Substitute dark, milk, or even flavored white chocolate for your drizzle depending on what you're craving.
- Make them a day ahead and store them in an airtight container at room temperature for worry-free entertaining.
 Save
Save These candy apples have become my go-to gift for neighbors, coworkers, and friends who appreciate something handmade and honestly delicious. Every time I make them, I'm grateful for that first accidental batch that sparked years of kitchen joy and perfectly glazed apples.
Common Questions
- → What type of apples work best?
Firm, tart varieties like Granny Smith or sweet Gala apples hold the candy coating well and offer balanced flavor.
- → How do I know when the candy reaches the right temperature?
Use a candy thermometer and heat until the mixture hits 300°F (149°C), which ensures the hard crack stage for a crisp shell.
- → Can I add other toppings to the candy coating?
Yes, rolling the coated apples in chopped nuts or sprinkles before the candy sets adds texture and visual appeal.
- → What’s the best way to drizzle white chocolate smoothly?
Melt white chocolate with a small amount of coconut or vegetable oil for a silky consistency ideal for drizzling.
- → How should I prepare the apples before coating?
Wash and thoroughly dry the apples, inserting wooden sticks firmly to ensure easy handling during dipping.