 Save
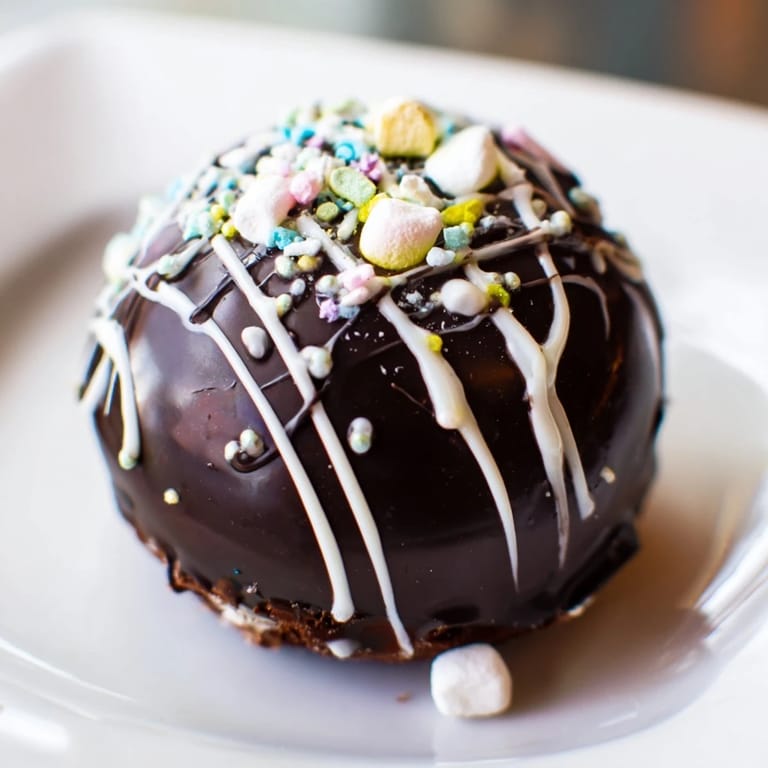
Save My kitchen smelled like cocoa for three days straight after I discovered these chocolate bombs at a winter market, and I became completely obsessed with recreating that magic at home. There's something theatrical about watching them dissolve into creamy hot chocolate that makes even a Tuesday morning feel special. The first time I made them, I burned the chocolate and had to start over, but that failure taught me patience with heat that I've carried into every batch since. Now whenever someone walks through my door on a cold day, these are what I reach for—not because they're fancy, but because they spark genuine delight.
I made a batch for my neighbor last February when she was stuck inside recovering from surgery, and watching her face light up when that chocolate dissolved was the moment I realized these weren't just dessert. She called me laughing because her teenage son had tried to eat one cold before she could stop him, and somehow that became our inside joke. Now she texts me pictures of the ones she's attempted herself, each one a little more confident than the last.
Ingredients
- 300 g high-quality dark or milk chocolate, chopped: This is where quality actually matters because there's nowhere to hide—get the good stuff and your bombs will taste noticeably richer, so buy from a brand you trust or ask your local chocolatier for a recommendation.
- 6 tbsp unsweetened cocoa powder: This is the soul of the filling, so don't reach for the sweetened baking kind or everything gets cloying fast.
- 6 tbsp powdered sugar: It dissolves instantly when the milk hits, creating that silky texture that feels indulgent.
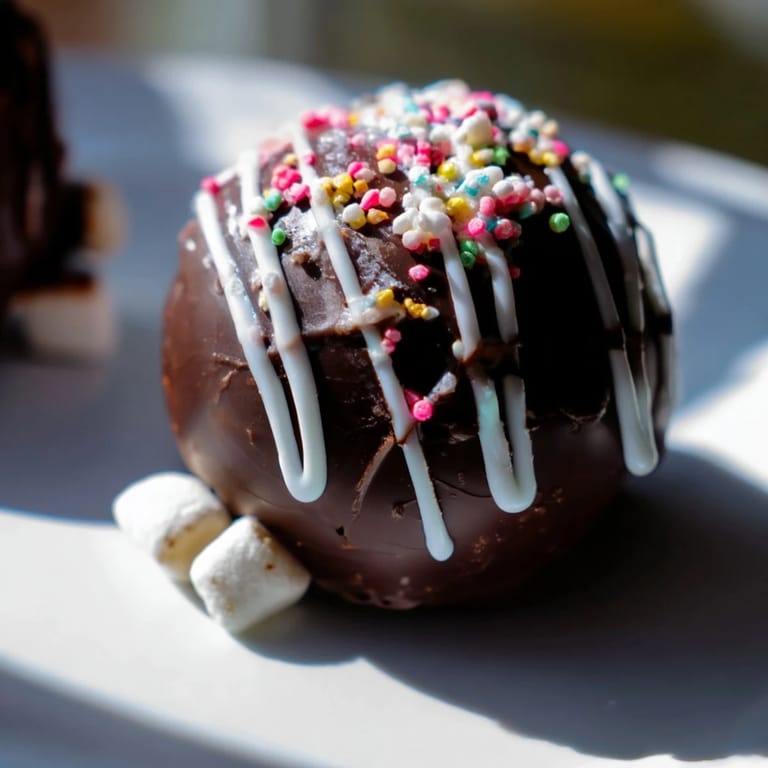
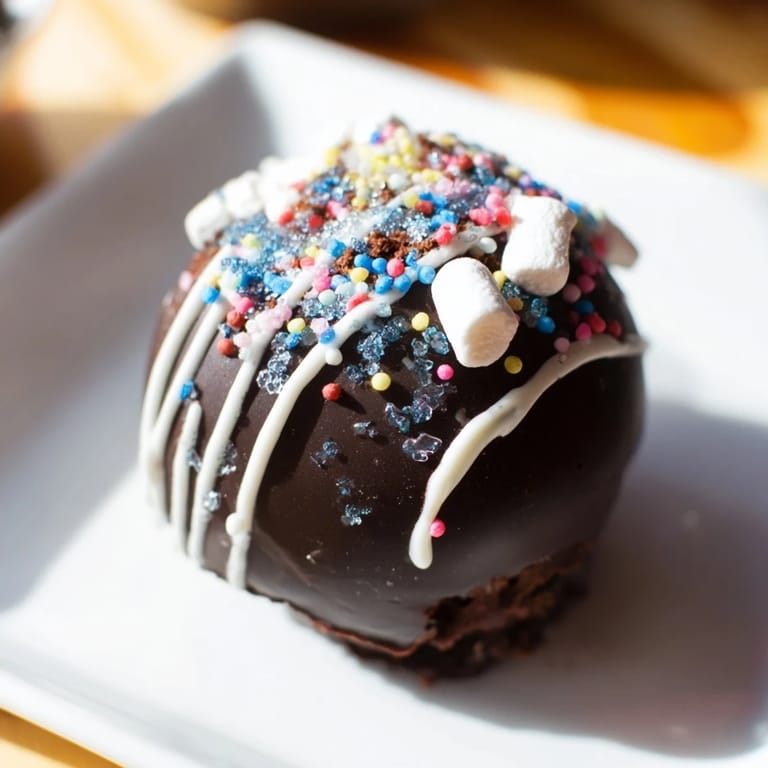
- 1 cup mini marshmallows: These are non-negotiable for the visual drama and that nostalgic sweetness, though you can swap in specialty flavors if you're feeling adventurous.
- 50 g white chocolate, melted (for drizzling): Purely optional, but the contrast looks beautiful and gives you something to do while you're waiting for everything to set.
- Sprinkles, to taste: Whatever brings you joy—I've used crushed candy canes, edible glitter, and even rainbow sprinkles depending on the season.
Tired of Takeout? 🥡
Get 10 meals you can make faster than delivery arrives. Seriously.
One email. No spam. Unsubscribe anytime.
Instructions
- Melt your chocolate carefully:
- Use a double boiler if you're nervous (I always do), or microwave in short 30-second bursts so you don't seize it—that grainy, broken chocolate texture is heartbreaking and irreversible. Stir between each burst and watch it like a hawk until it's completely smooth and glossy.
- Coat those molds with intention:
- Use a pastry brush and work methodically, making sure the chocolate reaches into every curve and crevice so you don't end up with thin spots that crack. A thick, even layer is your insurance policy against breakage.
- Chill and reinforce:
- Ten minutes in the fridge, then add that crucial second layer—this is what keeps your bombs from shattering when you pop them out. Give them a full 10 to 15 minutes on the second chill because rushing here always bites you.
- Unmold with a gentle touch:
- You'll feel a little thrill when they slide out cleanly, but if one cracks, just save it for hot chocolate tomorrow. There's no shame in the broken ones.
- Fill with confidence:
- One tablespoon of cocoa, one of powdered sugar, and a generous pile of marshmallows per shell—don't skimp on the marshmallows because they're what create that magic moment when the milk hits. Pack them in there.
- Seal the edges with warmth:
- Warming the plate in the microwave for 20 seconds, then gently pressing the rim of an empty shell onto it just enough to melt the edge is the key to a clean seal. Press the filled half onto it quickly and hold for a few seconds, then smooth any seams with your finger.
- Decorate if the mood strikes:
- Drizzle white chocolate while it's still warm and add sprinkles before everything sets, or keep them plain and elegant—both are equally delicious.
- Serve with theater:
- Place a bomb in a mug, pour in very hot milk (not quite boiling), and stir as it dissolves into creamy, dreamy hot chocolate. Watch someone's face and you'll understand why you went through all this.
 Save
Save There was this one Sunday when my partner and I made a whole batch together while it was snowing outside, and we got so distracted talking that we forgot about the chocolate setting twice. In the end we had this lopsided collection that looked nothing like the Instagram version, but they were absolutely perfect because we'd made them laughing at our own chaos. Those are the ones we remember most.
Why the Details Matter
Every step in this recipe exists because of something I learned the hard way—the double coating prevents cracks, the warmed plate edge creates clean seals, and the careful melting keeps your chocolate from becoming a grainy disaster. The first time I tried to rush and use one thin layer, everything shattered the moment I unmolded it, which was frustrating but incredibly educational. Now I see each detail not as a hassle but as the difference between bombs that survive and ones that become chocolate crumbs.
Customization That Actually Works
Once you master the basic version, the fun part begins—I've added cinnamon and chili powder to the filling for heat, swapped regular marshmallows for peppermint ones around the holidays, and even tried crushed cookies mixed into the powder. The filling is forgiving enough that you can experiment freely, and the worst case is you get a new flavor profile you maybe didn't expect but still enjoy. What matters is that the chocolate shell stays consistent, because that's what holds everything together literally and metaphorically.
Storage and Gifting
These keep beautifully in an airtight container at room temperature for up to two weeks, which means you can make them days ahead and look impossibly organized when guests arrive. I've wrapped them individually in tissue paper and tied them with ribbon for gifts, and people always respond like I've handed them something precious instead of recognizing how simple they actually are. That's the real magic—they feel like luxury but require only patience and a few decent ingredients.
- Keep them in a cool, dry spot away from direct sunlight or they'll start to bloom (that white coating that happens when cocoa butter separates).
- If you're gifting them, include a note with instructions because the surprise of knowing what to do adds to the experience.
- Make them in batches because once people taste one, they'll always ask you to make more.
 Save
Save These bombs are proof that good food doesn't need to be complicated, just thoughtful and made with a little care. Watching someone experience that moment when it all melts together never gets old, no matter how many times you make them.
Common Questions
- → Can I use white chocolate instead of dark chocolate for the shells?
Yes, absolutely. White chocolate works beautifully for the outer shells. You can also create a blend using both dark and milk chocolate for deeper flavor complexity. Just ensure the chocolate is melted smoothly for even coating.
- → How do I prevent the chocolate shells from cracking?
Apply at least two layers of chocolate for structural integrity, chilling between applications. Avoid sudden temperature changes when unmolding. If shells crack, seal minor breaks with melted chocolate before filling.
- → Can I prepare these ahead of time?
Yes, these keep beautifully when stored in an airtight container at room temperature for up to two weeks. This makes them ideal for advance preparation before serving or gifting. Keep them away from heat and humidity.
- → What marshmallow alternatives work well?
Flavored marshmallows like vanilla, strawberry, or cinnamon add interesting variations. You can also substitute with crushed peppermint candies, chocolate chips, or even cookie crumbles for different flavor profiles.
- → How hot should the milk be when serving?
Use very hot milk—nearly boiling around 200-212°F (93-100°C). This temperature ensures the chocolate shell melts completely and quickly, creating that satisfying melting effect and creamy final beverage.
- → Are there allergen concerns I should know about?
These contain milk and soy from chocolate. Traditional marshmallows contain gelatin, and some chocolate may have trace nuts. Always verify ingredient labels before serving to guests with allergies or dietary restrictions.