 Save
Save My sister called me in a mild panic one Sunday afternoon—she'd promised her book club homemade treats but forgot to actually make them. We had exactly two hours, so I walked her through these chocolate-dipped strawberry oat bars over the phone, and watching her send me photos of each layer felt like we were baking together despite living three states apart. What struck me was how forgiving the recipe proved to be, turning basic pantry staples into something that looked far more complicated than it actually was. By evening, her group was raving about them, and she's been making them ever since.
I made these one autumn when my partner came home stressed from work, and I remember him taking one bite, then immediately taking another, not saying anything for a moment. When he finally spoke, he just said, "These are dangerous," which I took as the highest compliment. That's when I realized these bars do something quiet but powerful—they turn an ordinary evening into something small and good.
Ingredients
- Old-fashioned rolled oats (2 cups): The backbone of texture here—they give you chewiness without being dense, and using the old-fashioned kind rather than quick oats makes a noticeable difference in how satisfying they feel to bite into.
- Almond flour (1 cup): Adds a subtle nuttiness and helps bind everything together, plus it creates a more refined crumb than oats alone ever could.
- Creamy peanut or almond butter (1/2 cup): This is your secret flavor amplifier and moisture keeper—it makes the bars stay soft for days, and whatever nut butter you love will work beautifully here.
- Pure maple syrup or honey (1/4 cup): Either one works, but maple syrup gives a slightly deeper, more complex sweetness that plays nicer with the chocolate finish.
- Melted coconut oil (1/4 cup): Keeps things cohesive and adds a subtle richness without competing with the other flavors.
- Vanilla extract (1/2 tsp): Just enough to round out the flavor profile without announcing itself loudly.
- Salt (1/4 tsp): This small amount does remarkable work bringing out the nuttiness and balancing the sweetness of everything else.
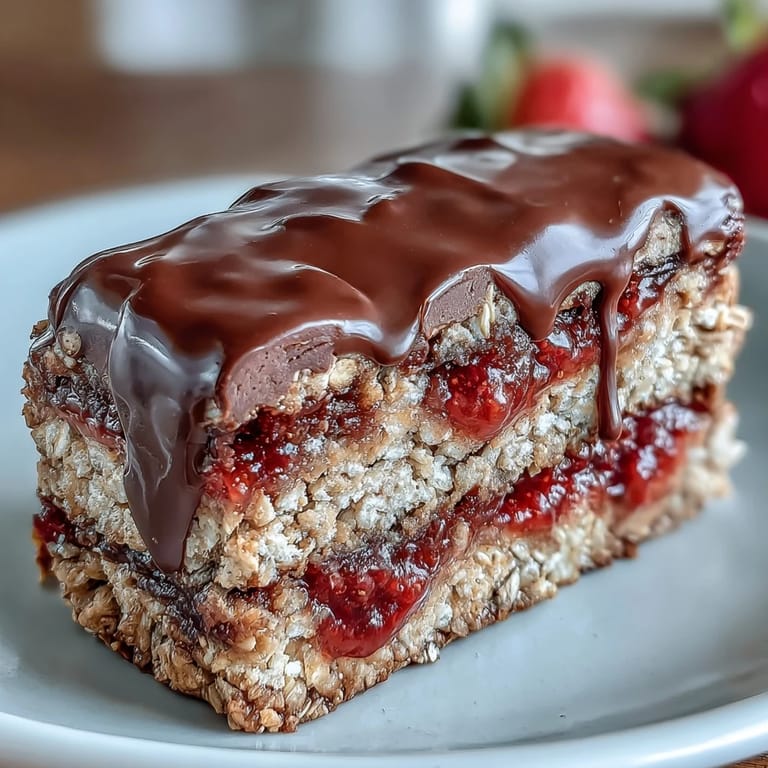
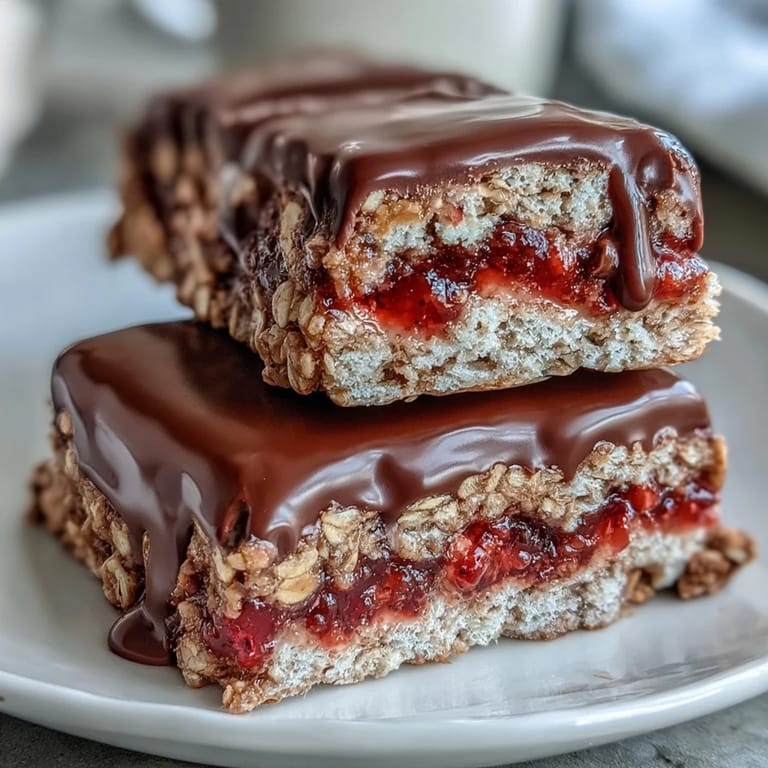
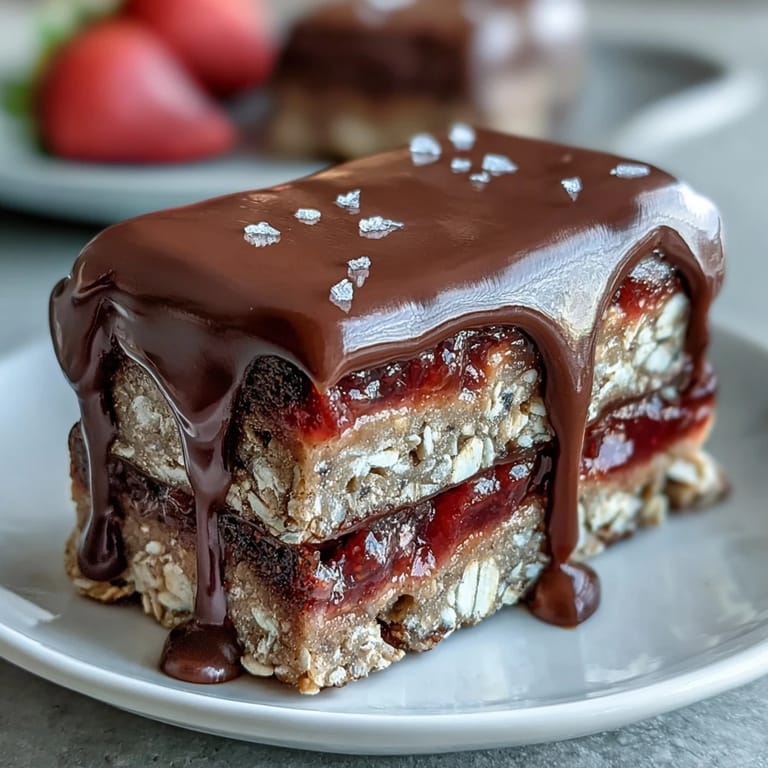
- Strawberry preserves (3/4 cup): The jammy heart of these bars—look for lower sugar versions if you can, as they let the actual fruit flavor shine through the sweetness.
- Freeze-dried strawberries (1/2 cup, lightly crushed): These add a bright, concentrated strawberry punch and a pleasant textural pop that fresh strawberries couldn't deliver.
- Semi-sweet or dark chocolate (6 oz, chopped): The final flourish—choose whatever chocolate you'd actually want to eat, because you can absolutely taste the quality here.
- Coconut oil for chocolate (1 tbsp): Thins the melted chocolate just enough so it drapes beautifully without adding any flavor of its own.
Tired of Takeout? 🥡
Get 10 meals you can make faster than delivery arrives. Seriously.
One email. No spam. Unsubscribe anytime.
Instructions
- Prepare your pan like you mean it:
- Line an 8x8-inch square pan with parchment paper, leaving enough overhang on the sides that you can grab it easily later. This step feels small but saves you from the frustration of trying to pry stuck bars out of a pan.
- Build your oat base:
- Combine the oats, almond flour, nut butter, maple syrup, melted coconut oil, vanilla, and salt in a large bowl, stirring until everything is sticky and holds together when you squeeze it. The mixture should feel like wet sand that's ready to build something with.
- Press down the foundation:
- Take about two-thirds of the oat mixture and press it firmly and evenly into your prepared pan, working it into the corners so you get an even base layer. Don't be shy—firm pressure here means the bars will hold together properly when you cut them later.
- Spread the jam generously:
- Spread the strawberry preserves evenly over the oat base in a thin, even layer, then sprinkle the crushed freeze-dried strawberries over top. The jam will soften slightly as it chills, creating a lovely jammy layer that binds everything together.
- Add your crumb topping:
- Crumble the remaining oat mixture over the strawberry layer and press it down gently but firmly so it stays in place when you slice. You're aiming for a texture that holds together but still has visible chunks of the oat mixture.
- Melt the chocolate carefully:
- In a microwave-safe bowl, combine your chopped chocolate and coconut oil, then microwave in 30-second intervals, stirring between each burst until everything is smooth and glossy. This gradual approach prevents the chocolate from seizing or becoming grainy.
- Add the chocolate finish:
- Either drizzle the melted chocolate generously over the whole pan and spread it with an offset spatula, or wait until they're chilled and dip individual bars into the chocolate. Both methods work—it just depends on whether you want an even coating or a more rustic look.
- Chill until set:
- Pop the whole pan into the refrigerator for at least 2 hours, though overnight is even better if you have the time. The cold firms everything up so you get clean cuts and bars that hold together beautifully.
- Cut and serve:
- Lift the whole block from the pan using the parchment paper overhang, place it on a cutting board, and slice into 12 even bars using a sharp knife, wiping the blade between cuts if the chocolate sticks. Each bar should be a neat square with visible layers.
 Save
Save I've made these bars for potlucks and just-because afternoons, but the memory that stays with me is bringing them to a neighbor who'd been under the weather. She took one bite and suddenly looked a little brighter, and that small moment reminded me why I love making things with my hands for people I care about.
Storage and Make-Ahead Strategy
These bars are genuinely forgiving when it comes to storage—they keep perfectly in an airtight container in the refrigerator for up to a week, and if you think you might not eat them that quickly, you can freeze them for several weeks. I've frozen them in a single layer on a baking sheet first, then moved them to a container once solid, and they thaw beautifully without becoming soggy. The cold actually improves them in a weird way, making the chocolate snap more pleasantly when you bite through.
Variations Worth Trying
Once you understand the basic structure of these bars, they become a wonderful canvas for experiments. Swap the strawberry preserves for raspberry or apricot if that's what you have or what you love—the framework stays exactly the same. For a nut-free version that's equally delicious, substitute sunflower seed butter for the almond or peanut butter and use oat flour instead of almond flour, and honestly, I couldn't tell you which version I like better.
Troubleshooting and Smart Moves
If your bars seem too soft after refrigerating, they probably just need more chill time or your kitchen is warmer than mine—give them another hour in the fridge and they'll firm right up. The opposite problem—bars that are too crumbly and won't hold together—usually means the nut butter was slightly less creamy than expected, so if you remake them, aim for the absolute most spreadable version you can find. Here are a few things to remember that will make your baking easier:
- Use the exact pan size specified because swapping to a different size changes how thick the bars bake and how long they need to chill.
- Let the chocolate cool for just a minute after melting before drizzling so it stays in place without running everywhere like a flooding river.
- Cut the bars while they're still chilled, then let them sit at room temperature for a few minutes before serving so the chocolate softens slightly and feels less brittle.
 Save
Save These bars somehow manage to feel both indulgent and completely reasonable to eat, which is probably why they disappear so quickly every time I make them. If you make them once, they'll become a regular thing—I can promise that much.
Common Questions
- → Can I use different fruit preserves?
Yes, raspberry or apricot preserves can substitute strawberry for a varied flavor profile.
- → How long should the bars chill?
Refrigerate for at least 2 hours to allow the layers to firm up properly.
- → Is it possible to make a nut-free version?
Use sunflower seed butter and oat flour to avoid nuts while maintaining texture.
- → Can I prepare these bars ahead of time?
Yes, they store well refrigerated up to one week or can be frozen for longer keeping.
- → What type of chocolate works best?
Semi-sweet or dark chocolate melts smoothly and pairs well with strawberry and oat flavors.